Best way to tackle this in PS

Messages
4,405
Name
Neil Williams
Edit My Images
No
This morning I went out with my girlfriend to get some back lit portraits just after sunrise, I was using a Nikon ZF with a Leica 90mm Summicron APO shooting hand held manual focus at ISO 400 1/160 f2 using a reflector to bonce the sun back onto her face...........When I loaded them up onto my computer in Lightroom and tried to edit them in PS using both ON1 and Topaz I really struggled to dehaze the image. So my question is what's the best way to tackle images like this?
Thanks in advance

Before

NDW_2100.jpg

My attempt using PS..........


NDW_2100.edit.jpg
 
This morning I went out with my girlfriend to get some back lit portraits just after sunrise, I was using a Nikon ZF with a Leica 90mm Summicron APO shooting hand held manual focus at ISO 400 1/160 f2 using a reflector to bonce the sun back onto her face...........When I loaded them up onto my computer in Lightroom and tried to edit them in PS using both ON1 and Topaz I really struggled to dehaze the image. So my question is what's the best way to tackle images like this?
Thanks in advance

Before

View attachment 421574

My attempt using PS..........


View attachment 421575
Could you use dehaze on a mask (just for her face)? Not tried it myself, but might be worth a try
 
I got reasonable results with Affinity by selecting the background, dehazing then adjusting that, then inverting the selection and processing her
 
Could you use dehaze on a mask (just for her face)? Not tried it myself, but might be worth a try
Thats the one in lightrom right.........I tried that but not as a mask and it didn't look good............I can try that again thanks
 
I got reasonable results with Affinity by selecting the background, dehazing then adjusting that, then inverting the selection and processing her
That would of been my thought process, but in PS, but I would of used layers and a mask on the subject, assuming that's similar to what you did in Affinity.
 
Thats the one in lightrom right.........I tried that but not as a mask and it didn't look good............I can try that again thanks
I don't use lightroom, but ACR is probably similar (y)
 
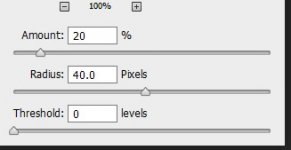
In the past and still use it today ~ LCE (Low Contrast Enhancement) settings in PS UnSharp Masking USM

USM LCE.jpg

The two figures shown can be a matter of how much effect you are wishing to achieve but the 'method' AFAIK is to adjust them in ratio i.e. 20 & 40; 30 & 60; 10 & 20 etc

Yes, it changes the whole image but no doubt there must be ways to selectively create the same effect?

DxO Photolab has its "Smart Lighting" and "Clearview Plus" tools
 
Last edited:
Suggestions only as above im afraid, but I have to say that I think the hazy effect from shooting with the sun behind her actually looks really nice. I wouldnt try to dehaze it personally :)
 
That would of been my thought process, but in PS, but I would of used layers and a mask on the subject, assuming that's similar to what you did in Affinity.
Yes, can easily do it with masks and layers, but possibly quicker and easier with selections.

Just tried it again leaving the background as it was, and it looks quite good.
 
What I find strange is the exceptional degree of the haze in the first place. It has the look you get with strong light caught on a greasy of huffed on lens. Against the light shots need squeaky clean optics.
I am not sure it is worth too much work on it, as it is not up to your usual standard.
While masking is your best bet, I do not think even major work will save it in a way that is convincing.
You will find that the haze and reflector light has given some unflattering modeling on her facial features when increased in contrast.

It looks like you might have used a metallic surfaced reflector, when a softer large one would have been kinder.

Still you now have the opportunity to try again.?
 
I'd just select the lady, quick burn and dodge to push up the contrast on her, and maybe tweek the saturation if the burning pushes it up too much.
 
I'd just select the lady, quick burn and dodge to push up the contrast on her, and maybe tweek the saturation if the burning pushes it up too much.
If you change the colour mode to lab colour, you can burn using the luminance channel, with out increasing the saturation.
 
Last edited:
Thanks everyone for the feedback.............here are a couple of before and after implementing a lot of your tips.

I basically made a selection of Fon and just worked on that and left the background alone. First of all using ON1 portraiture plugin, that helped with the noise and overall sharpness, I then added another filter from NIK software "Tonal Contrast" to boost the contrast and that was the kicker right there, I lowered the opacity to around 60% and the results are below;

Before
NDW_2169-2.jpg

After


NDW_2169.jpg


Before


NDW_2225.jpg

After


NDW_2226.jpg

On this last one I can remember thinking that the gold reflector might look nice (So flipped it over) but in hindsight I think a white/silver reflector would have worked better.
Thanks again for all the feedback
 
It looks like you might have used a metallic surfaced reflector, when a softer large one would have been kinder.

Still you now have the opportunity to try again.?
Yes next time I will stick to a white reflector. Fon's my girlfriend so we plan to try again on Sunday morning :)
 
The problem is in the capture not the processing. If you are going to take photographs into the sun then you need a good lens hood and NO filters. Something similar happened to me in a studio situation when there was a light in front of the camera (behind the model) and I had no lens hood but two filters which resulted in flare like this. Fortunately I could see something was wrong at the time and corrected it and then captured sharp images. Since then I have kept lens hoods permanently on all my lenses and do not use filters.

Dave
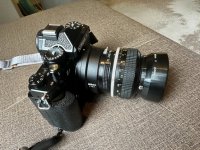
I also always use a lens hood and No filters

IMG_4684.jpg
 
The shot also looks very under exposed, most likely due to the back light. You need to expose for the shadow side.
 
Back
Top